My user at this CTF: https://play.fe-ctf.dk/users/21
Task Link to heading
[crypto], [local]
We've heard good things about Argon2, so this must be secure!
Note: Don't be so sad, have a pwnie[link]
Solution Link to heading
In this challenge we are given two images and some code. In the challenge there’s a link to another image, which is a picture of a pony. Here are the images:
flag.png
what.png
unipwnie-10.png

And here’s the provided code:
|
|
Funny story - I completely missed the “Argon2” hint because I rushed to solve this challenge… Argon2 is a key derivation function (KDF) and the intended way to solve this, might have been to guess the key used for the encryption (Which seems pretty gnarly to be honest…)
If you’ve ever tried to encrypt images using AES, you might be familiair with ECB mode and why that sucks. I recall hearing about about encrypting several plaintexts (Or images) using the same key. This kind of encryption is vulnerable to “known-plaintext attacks” and it inspired me to try to XOR each pixel from the what.png and flag.png images.
XOR’ing two ciphertexts (Or images) that was made with the same key, is known as a known-plaintext attack and I had the idea to try this for the images. In short:
|
|
So, the idea is, to take each pixel from both what.png and flag.png and XOR them. While that did produce results, I was having a hard time with my script because of the alpha channels. After a couple of hours I finally had a script that produced a workable result. I’ll post the script here and explain the idea below:
|
|
Description:
This Python script performs an XOR operation on two RGBA images, creating an output image.
The XOR operation combines the two input images to reveal differences between them.
How the Script Works:
-
The script uses the Python Imaging Library (PIL) to work with the images. It opens two input images:
image1andimage2. -
To ensure consistency, the script checks that both input images have the same dimensions (width and height). Images with different dimensions cannot be XORed together.
-
The script also ensures that both images are in the RGBA mode (Red, Green, Blue, Alpha). If they are not, it converts them to RGBA mode. RGBA mode allows us to work with color and transparency information.
-
An output image,
result, is created with the same dimensions as the input images. This image will store the result of the XOR operation. -
The script iterates over each pixel of the input images using nested loops. For each pixel, it retrieves the RGBA values from
image1andimage2. -
The script then performs an XOR operation on the RGBA values of the two pixels. XORing two values returns 1 (True) if they are different and 0 (False) if they are the same. This operation reveals differences in color and transparency between the input images.
-
The resulting XOR value is a tuple containing the RGBA values of the new pixel in the output image.
-
The script sets this XOR result as the pixel value in the
resultimage at the same coordinates (x, y) as the original pixels. -
The loop continues until all pixels in the input images have been processed.
-
Once all XOR operations are complete, the resulting
resultimage is saved to the specified output file path.
Here’s the result I got (You can switch the color theme of this site to see better):
result.png
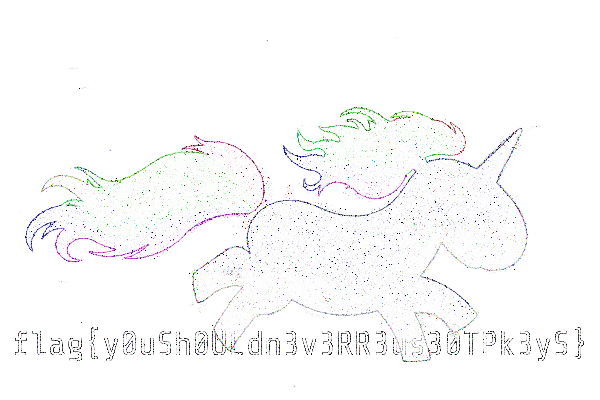
As mentioned, probably not the intended solution, but by fiddling with the contrast and colors I was able to read the flag. Thanks for the challenge 🍻